Tips, observations, comments - and some occasional whimsy - on gardening in general, and our Western PA backyard in particular.
Friday, May 6, 2011
So...what to do with all these zucchini?
With the number of people attempting their first gardens, and even for the rest of us who continue to have 'firsts' as we try something new each year, it's still an important question. Maybe we've finally added some space - perhaps a dinner with friends has expanded our gustatory horizons - or maybe we just want a new challenge.
As a long-time volunteer at our local Master Gardener garden hotline, I know we get this question every spring, even though we live in a fairly rural area where edible gardens reign. (Yes, I pass numerous barns & silos on my drive to work and occassionally have to literally wait for chickens to cross the road.) Often, someone has moved into the area or perhaps just moved away from home for the first time. A lot of families are trying to save money and many are interested in feeding their families food grown with minimal to no chemical pesticides.
At this point, I'm thinking I should say that mapping out a garden is the key to success, but frankly, I prefer following some general guidelines rather than getting out the graph paper. My best advice is to start by deciding what it is you love to eat. Not that I'm not personally guilty of growing "ornamental" leaf lettuce (I love it, but am sometimes too lazy to pick and prepare it for dinner) and then there was last year's Chinese eggplant experiment...
But I digress. Once you have your "love to eat" list, go online or to your favorite catalog and find out what each crop needs. Most veggies need full sun and good drainage, but some do well in shade or do not need loads of organic matter in the soil to thrive. Some (like lettuce) do well in cooler weather and are ready to eat when everything else is just getting started, so remember to leave room for more than one planting of these crops if you want to enjoy them all summer. Do not scrimp on space - if recommended spacing is 3 feet, give each plant at least that. And, if you're going to plant seeds on a hill, or in a row, and thin them after they come up, you need to be ruthless and do what's required. Not only will you grow bigger plants, but adequate spacing will reduce problems with diseases later on when the humidity and temperatures rise.
Find out if the crop ripens all at once. If so, processing it may mean you'll be spending your Labor Day weekend in the kitchen. If you'd rather spend it at the local fair, you may want to go easy when planting those crops. Of course if you're lucky enough only to be responsible for all the growing and someone else is willing to do the processing, then by all means get out the tractor and disk up a farmer-sized garden and plant 500 tomatoes!
Speaking of space, I'm always amazed at how much produce can be grown on a small plot of ground or even in containers. Any of the vine crops can be grown upright on sturdy supports. (You can either build permanent supports that will last over the years, or throw together temporary supports for the season at hand.) Not only does this save space, but it improves air circulation, reducing the potential for disease issues as the season progresses.
Finally, ask your fellow gardening friends how much they plant, how many people they feed, whether they preserve any harvest, and how much they give away or return to the compost pile. Most gardeners love talking about their gardens. Not once when I mentioned that I was thinking of blogging about this topic did I hear any stories about the time someone planted too little of anything. I attribute a lot of this to the way things are packaged. It's hard to leave those extra seeds or multi-pack transplants unplanted but consider sharing with your friends or donating to a community garden. If you do decide to preserve some of the harvest, maybe those friends would like to join you. If you still end up with too many tomatoes or summer squash, you can always help others by donating the excess to a local food bank or shelter.
Did I answer the question? I'm not sure I've given a definitive answer, but hopefully you'll now be able to avoid some common garden pitfalls. For those who still want numbers and a map for a garden to feed a family of four, check out Penn State's Circular #559 "Grow Your Own Vegetables". http://tinyurl.com/3f3f2r9
Linda Grotzinger
Friday, April 8, 2011
A New Perspective & An Old Row Of Blueberries
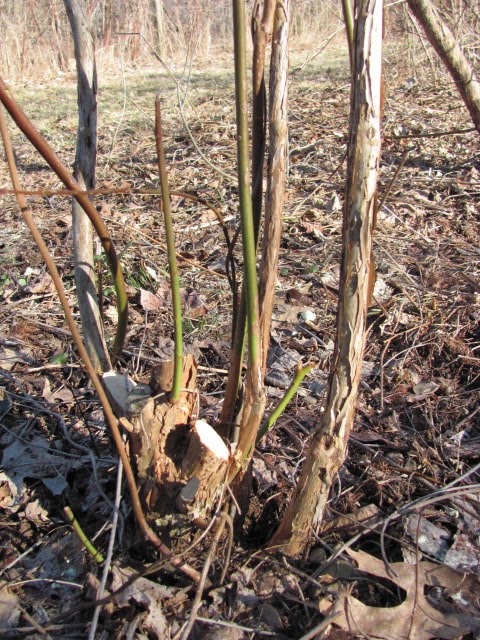
- The oldest canes have woody gray bark and are generally largest in diameter near the ground. These are the canes to remove.
- Which young shoots would produce blueberries & which would not? I tried looking at the tips of the older canes, but those were covered in flower buds and looked nothing like the young shoots coming from the ground. Then I thought to look at the bud structure...did blueberries have alternate or opposite buds? (think 'zig zag' for alternate and 'W' for opposite) This doesn't change in appearance between old & young shoots. Lucky for me, blueberries have alternate buds, while the seedlings coming up in the row were opposite. All were quickly dispatched to the growing pile of trimmings.
- Since none of my plants had the ideal 10-15 canes, I had to decide how many to remove. I chose to remove all of the largest canes, even if they may not have been 5 years old. This was not an easy decision, as they had the best flower buds. I decided that generating more new canes for the future would be worth it in the long run, even if that meant a reduced harvest this season. I consoled myself with the knowledge that fewer blueberries meant bigger blueberries, as the root system was still intact and feeding fewer canes.
- As with all woody plants, anything dead or dying was removed.
- What to do about plants with just one trunk? Cut them off at the ground and hope for new shoots or cut above the new shoots growing between the ground and 6 inches up? These new shoots were the diameter of a pencil and Manzanita red in color. I thought about experimenting by cutting one back to just above these shoots and the other one at ground level. I decided not to decide and moved on down the row.
Saturday, March 5, 2011
Can't Wait for Spring?
I cut about 5 or 6 long branches with nice buds near the ends. I laid them down on the plowed farm lane while I took pics of a deer-damaged rhododendron and 4 depressions in the snow nearby (where the deer had retired after dinner). Eventually I went inside...branches & camera in tow. Since I had a busy day ahead, I cut each stem at a steep angle, put them in a bucket of tap water, and left them in a corner of the laundry room (a cool, well-lit room without direct sun). That evening, I did some online research to see if these branches had a chance of blooming and was so discouraged that I just let them sit in the bucket...for two weeks!
The water was starting to get cloudy by the second weekend, so I knew I had a decision to make. The buds weren't shriveled, so I cut each stem (under water) to the length I wanted and immediately put them in a large glass jar with about an inch of water in the bottom. I brought the level of water up to a quart and added lemon juice, bleach and sugar (see recipe below) as a floral preservative. I swizzled it around and set the whole "arrangement" on the counter, not far from where they were before.
I continued on with life until I returned home one evening later that week to find my laundry room in bloom! It took 23 days from cut to bloom. It's been another 5 days and if possible, there are even more blooms and the water is still clear.
Here's what I should have done according to my research.
- Waited for outside temps to warm up to at least 35 degrees F for about 3 days in a row.
- Mixed up the preservative water separately, letting the water sit first to allow any chlorine to evaporate. (Commercial flower preservative works as well.)
- Immediately put the cuttings in a bucket of warm water (not giving them a chance to dry out on the lane).
- Cut the stems to length (under water & at a steep angle) ASAP.
- Cut vertical slits in the bottom of each stem (or smashed them with a hammer) - to enhance water uptake.
- Removed the buds that would be under water with a thumbnail. (I got this right!)
- Quickly put each stem in the jar with the preservative water.
Why did I have success? First of all, forsythia is very forgiving. Perhaps the cold temps worked in my favor? Too cold to dry out in the time between when I cut them & placed them in water. Why didn't the stems rot without the preservative during the 2 weeks they were in a bucket of water? It was relatively cool, around 60 degrees. There was no direct sunlight. My water (which comes from a spring) is zapped by UV light destroying any bacteria. I did cut the stems properly, as I knew to cut at an angle to allow the most surface area to take up water. I took 'soft' cuttings rather than more woody ones (think apple trees). Plus, I may just have been lucky. I'm not saying not to follow the rules, but if you can't do them all perfectly, just do your best and see what happens. You may have to wait a bit longer for flowers or change the water more often, but hopefully you'll be well rewarded. I've just inspected the apple and magnolia trees in my yard and need to wait for their buds to swell a bit more, but will be trying them next. Meanwhile, I've cut more forsythia and am hoping they'll bloom sooner if I follow my advice.
A couple more tips:
- Select stems that shoot straight up to the sky rather than ones with side shoots. These are more green to red than the woodier branches. (Don't worry that the buds at the bottom are small, you'll cut that off unless you're creating a floor-to-ceiling arrangement.)
- Remember that what you prune off isn't going to grow back in that spot. Not a problem with a large forsythia, but if you're pruning a young crab apple, start by just pruning out the branches you want to remove, then take your cuttings from what's on the ground.
- Try forcing blooms on any spring-flowering tree or shrub. Lilacs, citrus, plums, peaches, almonds...the list goes on. It's a good way to thin things out at a time when there's not a lot else you can do outside if you live in a cooler climate.
- Take more cuttings than you'll think you need. Sometimes "more" is better.
Recipe for preservative water: (this works for cut flowers, too)
1 teaspoon sugar
2 teaspoons lemon or lime juice
1 teaspoon household bleach
Starting forsythias from cuttings:
If you're wondering if you can start a forsythia bush by sticking a cutting in the ground, the short answer is "yes". The longer answer is that you need to wait until the ground thaws enough that you can get the cutting in the soil. (Remember the air temperature warms faster than the soil in the spring, so be patient.) If you wait until the branches leaf out, there's less chance of success. Select young stems rather than old woody ones. Remove the buds that will be in the ground w/ your thumb before "planting". You can cut one long branch & make smaller cuttings by cutting it into pieces. Be sure to stick them in the ground right side up by comparing the direction of the buds on your cutting to the buds still on the parent plant. How long should each cutting be? You'll need a few buds below ground & several above. I'd not make it so long that it falls over, but long enough that you won't step on it or mow over it either. It's your choice. Finally, don't use the same cuttings you forced into bloom in the house. Get new ones in the spring while it's still cool outside, but after the frost has left the ground.
Linda Grotzinger
Sunday, February 20, 2011
Intro...
With basic horticulture science as my foundation, each year's unexpected events keep me engaged in gardening. This year, I'm planning to "landscape" around the house with my own "field trial" of sunflowers in beds. These beds will eventually become home to adapted shrubs and perennials once I've done my research and created a design that pleases me.
As for this blog, I've had requests for getting started with asparagus, for guidance on selecting healthy plants, and for my opinion of those upside-down tomatoes. If you have an idea or two, send me an email at lindag@hotpepperwax.com and check back to see if they appear here in the future.
Meanwhile, it's time to take the camera into my garden on those sunny, snowy days and enjoy my winter garden while it prepares for spring.