Friday, November 18, 2011

Remember your trees this fall!

Like you, I've been busy getting my yard (in this case a 100 acre farm & woodlot) ready for winter. This means a long list of outdoor tasks, not all of which will get done before winter's deadline. Rather than re-create my garden "to do" list in this space, I decided to focus on a couple of things you can do that will really make a big difference in the long-term success of your home landscape.

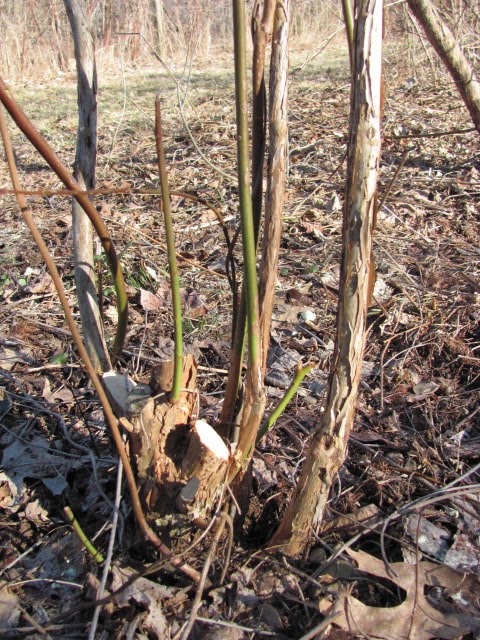
When you stop to think about it, trees & shrubs are the foundation or backdrop for everything else that we grow. They remain and slowly change over time by getting larger, creating shady habitats for other plants that will come & go over the years. On the other hand, forces beyond our control can make trees and shrubs change dramatically. Weakened branches can snap off in a storm...climate stress can pave the way for disease & insect problems...and all these problems can persist and get worse over time.

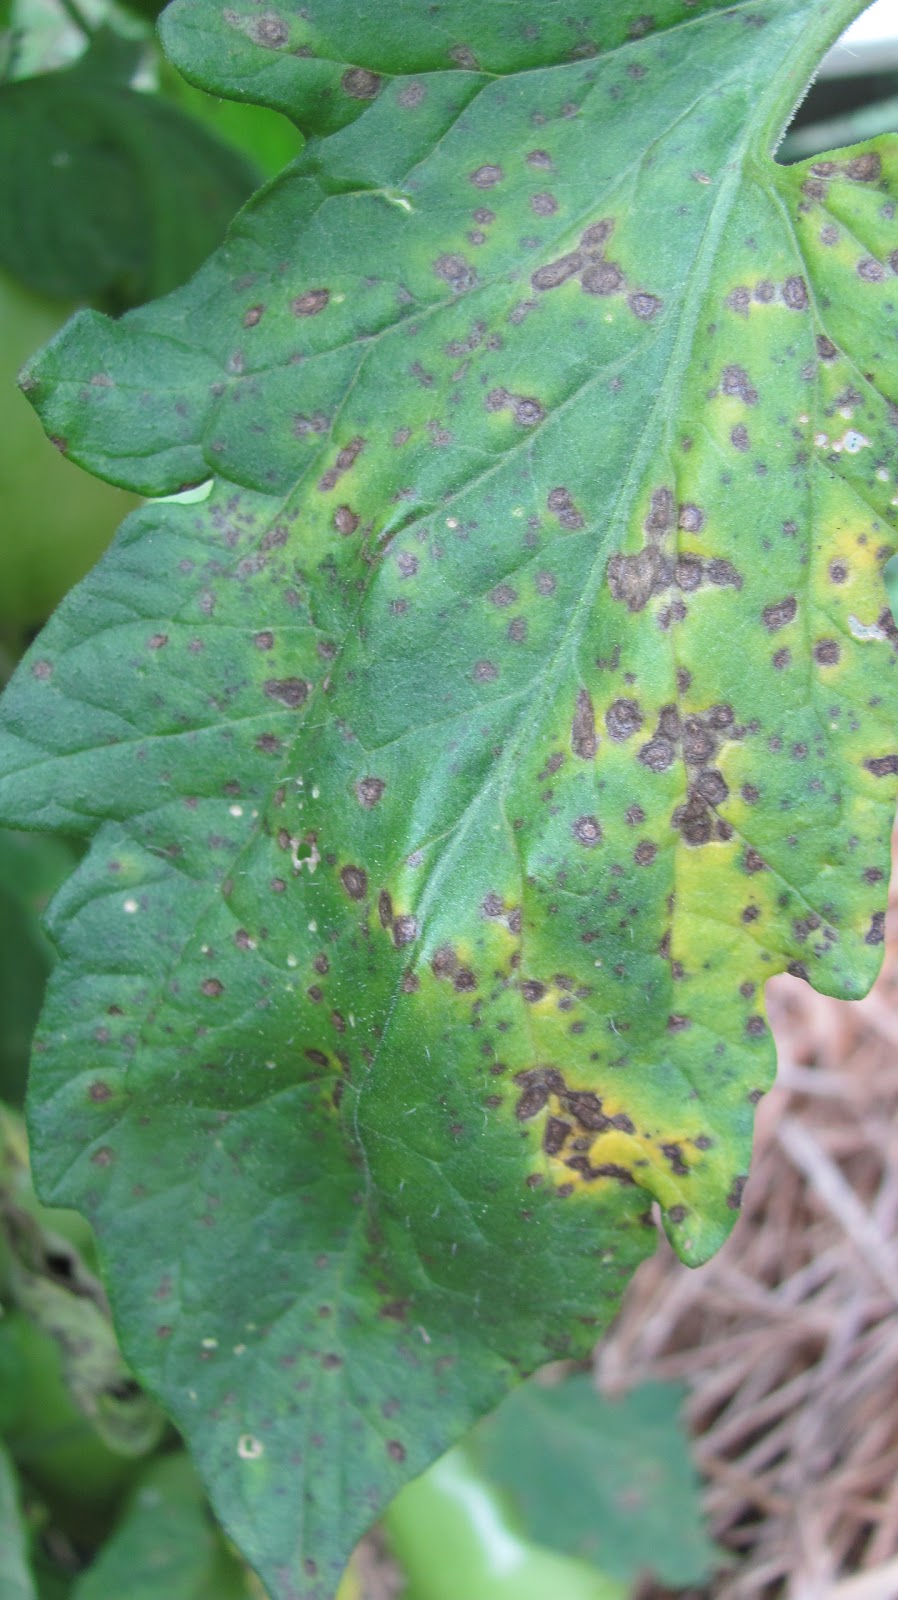
This year in our area (Northwestern Pennsylvania - zone 5) we saw it all - extremes of spring floods, a month-long drought in July, and record breaking rainfall in the months of September & October. All these events are stressful at the time, but easily forgotten a year or two down the road. Then a tree starts dying from the ground up, or a branch will go here or there...all a result of conditions we cannot control.

All is not lost. What we can do for those trees & shrubs that we hope survive well past our turn as "gardener in chief" are a couple of simple things that amount to "food & drink". The time of the year after leaves have dropped & before the ground freezes is short but is your chance to make a huge difference in the quality of your landscape long-term.

Woody ornamentals (i.e. trees & shrubs) will benefit greatly from a light application of a tree/shrub fertilizer (or even straight Nitrogen if that's all you have). Just spread a granular (or liquid spray) fertilizer evenly under the tree & out past the canopy if you can. Then let the snow or rain water it in. What I love about this time of year is that even the least expensive fast-release fertilizer won't burn.

You may be thinking "Fertilize in the Fall?? You're crazy!" - I know I did. I'd been taught that this would send a tree into winter in a weaker state making it more susceptible to the impending cold. Research done some time ago shows that tree/shrub roots (which are still actively growing in ground that is actually warmer than the air this time of year) will take up nutrients in the fall & store them until spring. Trees that are already hardened off will not break dormancy. As our "woodies" begin to grow & leaf out in the spring, these nutrients are gradually available. This avoids the problem of rapid/succulent growth that spring fertilizer applications can create.

Additionally, if you live where the ground freezes in winter, have a sandy soil that dries out quickly, or don't get plenty of rain just before winter, all "woodies" will benefit from a good drink of water. Just set a garden hose on low & let the water really soak in while you're planting tulips, a new tree just bought on sale, or digging dahlias for storage. Yes, you do need to move the hose occasionally, but anything you do now will pay dividends next year. Conversely, if the forecast is for plenty of rain, know that Mother Nature is taking care of it for you this year.

Once the ground is frozen, it's time to mulch. Normally, that's around Thanksgiving in our area. This means we still have a couple of weeks to give a healthy boost to those plants we want to nurture for years to come.


Friday, September 23, 2011

Topiary tomatoes - an unintended consequence

As I removed the last remaining tomato plant from my garden, I had time to ponder the question "Will I ever do this again?" After a second heart-breaking season in just three years, I'm seriously considering taking a break from growing tomatoes. Why such a rotten attitude? Two words: "late blight" - the same fungus that caused the Irish potato famine.

Normally, I enjoy the challenges of growing my own food. My tomatoes survived an early pruning by the ground hog that lives under my deck and significant defoliation by tobacco worms this year. I've come to expect the slow progression of early blight each season. The problem with late blight (as the name implies) is it doesn't appear until your tomatoes are doing so well you start to wonder if the supports will handle the weight of a multitude of green tomatoes. You begin to think you're home free, but the next thing you know, you're ripping out plants and tossing out tomatoes that will never ripen.

I know I'm not alone this year - the number one call at the local Master Gardener hotline in August was "What do I do about the blight?" Since one can be managed (early blight) and the other (late blight) is a swift death sentence, it's important to know which one you have. Luckily, the first symptoms appear in different places and are easy to distiinguish.

Early blight shows up as tiny brown spots on the lower leaves and progresses slowly up the plant. Eventually, the spots will get larger and the stems and fruit will be affected, but if you remove infected leaves as they appear, it's still possible to harvest a crop of vine-ripened tomatoes. If you are curious, take a close look at the larger leaf spots and you will see a pattern of concentric rings within each spot. (Think bulls-eye or ripples in a pond...)

Early Blight - early on

Late blight first appears as a "water-soaked" blotch on leaves (anywhere on the plant) and progresses rapidly to large dark brown spots on leaves and stems. A "water mark" is harder to see, but it's a symptom you'll never miss once you've seen it. If conditions are favorable, the blotches grow and tissue dies - eventually fruit starts to rot. Just a few days after the first symptoms, the plant is so affected that you will realize there's no salvaging this crop.

Late Blight - early water marks


Late Blight - more severe

Late Blight - worse


Both diseases can be prevented with an appropriate fungicide labeled for use on food crops. The critical point is that this treatment is "preventative" not "curative". It must be in place and covering all plant surfaces before fungal spores land. If not, infection will occur as soon as the weather cooperates. (Early blight likes it hot, wet and humid while late blight thrives during cooler, wet summer weather.)

As for "topiary tomatoes, that's the name I gave the one Roma tomato I planted this year because (if you don't look too closely) you'd think it was pruned in topiary style. The reality is that early blight foliage removal inadvertently results in this form. "Health Kick" was a spur of the moment pick at the greenhouse this spring. While it's more susceptible to early blight than the older "Celebrity" tomatoes I grew, I was able to harvest over 30 Roma tomatoes from one plant before early blight won. All Roma tomatoes have a natural resistance to late blight. So for now at least, I know I'll plant another Roma tomato and have time to see if my attitude changes about growing the others over the coming winter.


Topiary tomato - Early Blight on Roma tomato


Sunday, August 14, 2011

They're baaack....

No, not poltergeists - but almost as scary. We're talking about those great big, give-me-the-creeps-but-kind-of-cool-just-the-same, chartreuse, totally smooth "worms". Every year, they take me by surprise, even though I know they're on their way. I had plenty of notice this year...first, I fielded a call from someone who thought deer were eating their tomato plants. We soon ruled out groundhogs, as they were being eaten from the top down. I was stumped until the caller mentioned big bites out of green tomatoes and (this was the home run clue) the piles of dark brown stuff on top of lower leaves and fruit. The light bulb went off...the hornworms had returned for the season.

A few weeks ago, my remodeling contractor asked me if I knew what the humming bird-like moth was at his feeders. I told him he was seeing the adult form of the Sphinx Moth (or Hummingbird Moth) and that it would become the more familiar green worms that appear in his garden from time to time.

Next, one of our Facebook friends posted that she was on the lookout for them in her garden up in Maine. That was incentive enough for me to start inspecting my Pennsylvania garden on an occasional basis. Inspection at this point mostly consists of looking for missing leaves near the top of the plant (where a "stem skeleton" is all that's left), small piles of dark brown excrement lower down, and big bites out of green fruit. Basically, not much was happening - just a lot of growth to reposition inside the wire supports I'd installed. Then I got distracted and missed a few days. When I resumed my inspections, I was shocked to see what had happened in the meantime.

A major part of the canopy on a couple of plants was gone! And sure enough, the tell-tale signs of excrement were present below. I immediately abandoned "inspection mode" and went straight to "search & destroy".

Turns out this is a banner year for these pests. So far, I've found about 6 on my "Health Kick" plant (which makes me wonder if they can read and are into good health) and an equal number on the four Celebrity tomatoes I'd planted. More in two days than I usually find in an entire season!

So, how to manage them? First, you need to find them. The best time of day to look is when the sun is low, either early or late in the day - not at high noon. The only defense these guys have is their coloring and ability to live upside-down (belly up), hanging by their toes from stems and protected beneath leaves from sun and predators, so they are good at hiding.

I'd be remiss if I didn't mention that I could have prevented the problem by spraying Hot Pepper Wax regularly before the hornworms grew big. Since it's too late for that, I chose to remove them with my pruners (as close to the stem as I can without touching them). I toss them where the birds will find them  -- that means under the bird feeders this year. Some were gone just an hour later and I'm sure all will be gone by sundown. There are other, more gruesome alternatives for control, but this solves my problem and helps the birds at the same time.

Since I had so many indivuals to choose from this year, I'm including some pictures of this year's crop of Tobacco Hornworm larvae, signs of their presence, and a borrowed pic of the adult moth. One of the most damaging insects for tomatoes, they're also one of the easiest to control when in the larval stage. (Adults are good pollinators, so leave them alone and just remove the larvae causing damage.) Happy hunting...

Linda Grotzinger

Damage to foliage and hidden larva - can you find it?


Excrement on lower leaves

Damage to green fruit

Larva upside down and protected by foliage

Close-up of tobacco hornworm - tail (horn) is red

Adult moth


Monday, June 27, 2011

Tastier Tomatoes - Part 2: The sequel

So you're back for more info on growing tastier tomatoes? Let's pick up where we left off in Part 1. You just finished watering your plants...

Fertilizing and soils - pay attention because this affects flavor BIG-TIME! Start by building up your soil with organic matter every year before planting. Incorporate rotted leaves, composted materials, aged manure, etc. Avoid adding ash from wood stoves - it can raise the pH (good if yours is too low), but my experience is people add too much and create new problems. Do a soil test before adding any fertilizers. The results will show your soil's pH & calcium levels and it will also give you recommendations to bring them to correct levels just for tomatoes. In our area, we can purchase a kit for $10 at our local County Extension office - results typically come back within a week. Ideal pH for tomatoes is slightly acidic - 6.0 to 6.5. If your soil is more acid than this, add lime (in a readily available form) on top of the soil/under the mulch. If your soil pH is too high, it can be lowered by using sulfur. Avoid applying elemental sulfur when the weather is hot, as it will burn plants. Check locally for less 'hot' materials that are good for your area soils. Or, plan to adjust the pH in the fall after the harvest is in.

No blooms? A common problem in our area is people who grow great tomato plants that don't produce tomatoes. This can be a pollination problem or too much nitrogen. If you are going to add a commerical fertilizer, be sure it's a complete fertilizer that includes phosphorus & potassium. A 1:2:1 ratio (like 5-10-5) works well for tomatoes. If the first number on the label is higher than the other two (like 21-7-14) use this fertilizer on your lawn - NOT on your tomatoes. Be sure to follow the label directions and don't overdo it. Again, a soil test is really helpful so you know you're adding only what you need. In our area, the test may show a need for calcium. This is easy to do, but you'd never know without the test results.

While I add manure every Fall (that I work in before planting the following year), sometimes I notice yellow leaves appearing at the bottom of my plants. This symptom (and slow growth), indicates a lack of nitrogen. (Sometimes I cause this myself by working some of last year's straw mulch before it's totally decomposed.) At that point (or before, if I'm on the ball), I add a low rate of a liquid fish-based fertilizer to both the foliage and the soil. Yellow leaves at the bottom of plants can also be disease symptoms, but if there are no brown spots and it's early in the season, it's most likely a lack of nitrogen.

Foliage - Maintain a good foliage canopy throughout the season. This means you shouldn't pinch out young stems early in the season (even though some people recommend that for growing "giant tomatoes"). Even I have to fight the urge to pinch, pinch, pinch - but it's best just to leave them on & be ready to provide sturdy supports. Foliage not only provides cover, but produces everything needed during the ripening process. Think of the foliage as the engine that produces all the flavor. You are working against your goal if you remove healthy foliage.

Finally, when days shorten and nights turn cool, it's common to want to help tomatoes ripen faster. In an effort to get more sun on half-ripe tomatoes, people start vigorously removing leaves. In a word - DON'T! This causes several problems, most notably sunscald of actual tomatoes. Removing leaves also gives disease organisms a huge advantage - the door is held wide open for them to enter and wreak havoc. When I've lost canopy due to insect feeding (or some other incident), I've actually used row covers over my tomatoes late in the season to provide some shade for the tomatoes. As the season progresses, it does double-duty as frost protection.

And there you have it - a guideline for growing healthy, tasty tomatoes. Give it a go and the next thing you know, your friends & neighbors will be asking you for advice - or for some tomatoes!

Linda Grotzinger

Getting ready to mulch the garden after a nice rain.

Garden mulched with straw...

Close-up of mulch around young tomato plant.


Friday, June 24, 2011

Tastier tomatoes? Really??

Want to grow tastier tomatoes this year? Here's Part 1 (watch for the sequel!)

When someone suggested I blog about growing tastier tomatoes, my initial thought was that I would be happy to -- if I had a clue myself. I quickly filed it away in the 'maybe later but don't hold your breath' file.

Then, at the Allegheny Green Fest a few weeks ago, I chatted with a couple who'd just heard a talk on this topic. They confided that they now knew the secret to tastier tomatoes and that they'd been doing "everything wrong" in past attempts. I found that hard to believe, so I asked them what they planned to do differently this year. Turns out their "different" way was following some basic practices that I was already doing. That encounter was quickly followed by a conversation with a friend who's almost fanatical about "home-grown tomatoes" (I send her a shipment of my tomatoes each year). She told me another friend had shared their tomatoes with her last year, but that MY tomatoes tasted much better. While I assumed that this was a ploy to keep the tomatoes coming, her comment DID make me start thinking more about this subject.

Perhaps sharing some good garden practices for growing tomatoes will help some home gardeners grow better tomatoes, and if you grow better tomatoes, you get better flavor. So, here's my "sharing"!

It almost goes without saying that you need to grow varieties that are known for good flavor. However, before considering flavor, you need to screen varieties to determine tomato plants that will do well in your climate & soil conditions. Great taste means nothing if your growing season is too short for a variety you've selected, or if you're in a climate conducive to diseases and you don't select varieties with good disease resistance. How can you know which varieties taste best? Conduct your own taste test (hard work, I know)...maybe at a farmer's market or by asking your fellow tomato growers to let you taste their favorites. (FYI, I always grow 'Celebrity' tomatoes, but I also pick out something new to try each year. Last year it was 'Jet Star', this year it's 'Health Kick'.)

If you haven't already planted your tomatoes at the recommended spacing (or wider), that's the first step. The next most important thing you can do is to mulch them. Right away. One year I mulched about half my tomatoes within a week of planting them while the rest waited until I could get back to them. Not only was there the expected difference in weed growth, but there was an obvious size difference between those mulched early and those mulched late. This effect remained for the entire growing season. If you don't want to buy mulch, try my method: I use 3 inch thick flakes of straw (because I have it on hand), but half-inch stacks of newspaper work well, as does plastic (though it's a bit harder to monitor the moisture under plastic). Plant size is one benefit; other benefits of mulching include less risk of blossom end rot and disease spreading, and less watering on your part.

Support your tomatoes - don't let them sprawl on the ground. Good support helps avoid a multitude of problems - critter damage and diseases are two. Use sturdy wooden stakes, wire cages supported by stakes, or make your own supports. Have them in place before your plants get big to avoid breaking vines later.

Water - remember to water your plants before they dry out to the point of visable wilting. If you've mulched them, this will be an easier task. Let the water run slowly until it soaks deeply into your soil to encourage deeper roots that can access the water when soils dry out from the top down.

Okay. There's a good starting point - and a good ending point for "Part 1". In the sequel (Part 2) we'll talk about stuff that's a little less basic. Like getting the pH tomatoes prefer... What to do if your tomato plants don't bloom... Foliage issues...

So if you haven't already staked or mulched your tomatoes, get it done after a nice soaking rain or thorough irrigation. Come back in a few days and we'll tackle the next steps.


Linda Grotzinger

Friday, May 6, 2011

So...what to do with all these zucchini?

There's never a simple answer to the question of "How much should I plant in my garden?" It's more of an interview that begins with more questions and ends with "It depends..."

With the number of people attempting their first gardens, and even for the rest of us who continue to have 'firsts' as we try something new each year, it's still an important question. Maybe we've finally added some space - perhaps a dinner with friends has expanded our gustatory horizons - or maybe we just want a new challenge.

As a long-time volunteer at our local Master Gardener garden hotline, I know we get this question every spring, even though we live in a fairly rural area where edible gardens reign. (Yes, I pass numerous barns & silos on my drive to work and occassionally have to literally wait for chickens to cross the road.) Often, someone has moved into the area or perhaps just moved away from home for the first time. A lot of families are trying to save money and many are interested in feeding their families food grown with minimal to no chemical pesticides.

At this point, I'm thinking I should say that mapping out a garden is the key to success, but frankly, I prefer following some general guidelines rather than getting out the graph paper. My best advice is to start by deciding what it is you love to eat. Not that I'm not personally guilty of growing "ornamental" leaf lettuce (I love it, but am sometimes too lazy to pick and prepare it for dinner) and then there was last year's Chinese eggplant experiment...

But I digress. Once you have your "love to eat" list, go online or to your favorite catalog and find out what each crop needs. Most veggies need full sun and good drainage, but some do well in shade or do not need loads of organic matter in the soil to thrive. Some (like lettuce) do well in cooler weather and are ready to eat when everything else is just getting started, so remember to leave room for more than one planting of these crops if you want to enjoy them all summer. Do not scrimp on space - if recommended spacing is 3 feet, give each plant at least that. And, if you're going to plant seeds on a hill, or in a row, and thin them after they come up, you need to be ruthless and do what's required. Not only will you grow bigger plants, but adequate spacing will reduce problems with diseases later on when the humidity and temperatures rise.

Find out if the crop ripens all at once. If so, processing it may mean you'll be spending your Labor Day weekend in the kitchen. If you'd rather spend it at the local fair, you may want to go easy when planting those crops. Of course if you're lucky enough only to be responsible for all the growing and someone else is willing to do the processing, then by all means get out the tractor and disk up a farmer-sized garden and plant 500 tomatoes!

Speaking of space, I'm always amazed at how much produce can be grown on a small plot of ground or even in containers. Any of the vine crops can be grown upright on sturdy supports. (You can either build permanent supports that will last over the years, or throw together temporary supports for the season at hand.) Not only does this save space, but it improves air circulation, reducing the potential for disease issues as the season progresses.

Finally, ask your fellow gardening friends how much they plant, how many people they feed, whether they preserve any harvest, and how much they give away or return to the compost pile. Most gardeners love talking about their gardens. Not once when I mentioned that I was thinking of blogging about this topic did I hear any stories about the time someone planted too little of anything. I attribute a lot of this to the way things are packaged. It's hard to leave those extra seeds or multi-pack transplants unplanted but consider sharing with your friends or donating to a community garden. If you do decide to preserve some of the harvest, maybe those friends would like to join you. If you still end up with too many tomatoes or summer squash, you can always help others by donating the excess to a local food bank or shelter.

Did I answer the question? I'm not sure I've given a definitive answer, but hopefully you'll now be able to avoid some common garden pitfalls. For those who still want numbers and a map for a garden to feed a family of four, check out Penn State's Circular #559 "Grow Your Own Vegetables". http://tinyurl.com/3f3f2r9

Linda Grotzinger

Friday, April 8, 2011

A New Perspective & An Old Row Of Blueberries


After spending 2 days at the Pittsburgh "Farm to Table" event recently talking to both experienced and novice gardeners, I now have a new perspective in my own garden. Here is a recent example.

Pruning blueberries was not at the top of my early spring 'to do' list, but the weather made me reconsider. A cold wind coming off the lake blustered in the area I'd intended to work in, but it was sunny and milder near the old row of blueberries...so they got my attention.

So what does this have to do with a new perspective on gardening? Well, even though I'd professionally pruned landscape plants for years, I'd never actually pruned a blueberry bush. I found myself looking at a row of about 30 plants, most of which had never been touched. I started to feel a bit intimidated, much like the wanna-be first time gardeners I'd met over the weekend. Where to start? I wanted to improve things, but we'd had a record year of production last year and I knew the pruning I needed to do would remove this year's flower buds.


I gave myself a pep talk. Basically, I reminded myself that I already knew some basics. First off, I knew that pruning for fruit is different from pruning landscape plants. Second, I knew where to find research-based information about pruning almost anything on the web. Finally, I knew I had that "safety net" of blueberries still in the freezer from last year. So what if I pruned too hard. Plus, I'd read the regional Extension bulletins during the winter & knew to completely remove some of the oldest canes. I had shiny new, easy-to-use loppers in hand - - now it was time to get started!

After a few cuts, though, I had the same uncertainties first-time gardeners deal with. The pruning gurus said to take anything older than 5 years as those canes are less productive and to keep a couple of the one, two, three and four year old canes. But how to tell which were the oldest canes? How to tell which shoots were young blueberries & not dogwoods or maples? And most of my plants only had 4 or 5 canes (because they'd never been pruned or fertilized to stimulate new canes) and a couple only had one main trunk! This information was not in the literature, so I had to think for myself. Here's part of my thought process.


  • The oldest canes have woody gray bark and are generally largest in diameter near the ground. These are the canes to remove.

  • Which young shoots would produce blueberries & which would not? I tried looking at the tips of the older canes, but those were covered in flower buds and looked nothing like the young shoots coming from the ground. Then I thought to look at the bud structure...did blueberries have alternate or opposite buds? (think 'zig zag' for alternate and 'W' for opposite) This doesn't change in appearance between old & young shoots. Lucky for me, blueberries have alternate buds, while the seedlings coming up in the row were opposite. All were quickly dispatched to the growing pile of trimmings.

  • Since none of my plants had the ideal 10-15 canes, I had to decide how many to remove. I chose to remove all of the largest canes, even if they may not have been 5 years old. This was not an easy decision, as they had the best flower buds. I decided that generating more new canes for the future would be worth it in the long run, even if that meant a reduced harvest this season. I consoled myself with the knowledge that fewer blueberries meant bigger blueberries, as the root system was still intact and feeding fewer canes.

  • As with all woody plants, anything dead or dying was removed.

  • What to do about plants with just one trunk? Cut them off at the ground and hope for new shoots or cut above the new shoots growing between the ground and 6 inches up? These new shoots were the diameter of a pencil and Manzanita red in color. I thought about experimenting by cutting one back to just above these shoots and the other one at ground level. I decided not to decide and moved on down the row.

I made it through about half the row that first session. It was time to stand back & look at the larger picture. I saw a row of blueberries that will be much easier to cover with bird netting and some plants that could use a shot in the arm. As a result, I've adjusted my blueberry care plan to include fertilizing with ammonium sulfate in addition to adding sulfur (to keep pH between 4.5 and 5.0 - that's really low.) This will provide nitrogen to stimulate new shoots and will acidify the soil, making the nutrients already present more available to plants that thrive in acid soils.

Finally, since these plants will not receive supplemental water, my seasonal plan includes mulching to conserve moisture critical to production. Lucky for me, the llamas in the barn generate plenty of well-rotted sawdust, an ideal material for blueberries. Looks like my blueberry plan is coming together. If you are considering growing blueberries either for fruit or landscape value, here are links to the same good information I used. Allegheny County Extension Educator Sandy Feather's article "Pruning Blueberry Bushes" http://www.donnan.com/Blueberry.htm and Ohio State University Extension Fact Sheet http://ohioline.osu.edu/hyg-fact/1000/pdf/1422.pdf .

Linda Grotzinger

Before pruning...


Old (gray) and young (red) stems...


After pruning...

Saturday, March 5, 2011

Can't Wait for Spring?

Me neither...that's why on the last day of January I grabbed my pruners and made a beeline for the forsythia bush that I started years ago from a cutting stuck in the ground. Never mind it was 20 degrees with a foot of snow on the ground, the sun was shining and that was enough for me. First, I'll tell you what I did (not necessarily what I'd tell anyone to do if I had my horticulturist hat on)...then, I'll tell you what I should have done.

I cut about 5 or 6 long branches with nice buds near the ends. I laid them down on the plowed farm lane while I took pics of a deer-damaged rhododendron and 4 depressions in the snow nearby (where the deer had retired after dinner). Eventually I went inside...branches & camera in tow. Since I had a busy day ahead, I cut each stem at a steep angle, put them in a bucket of tap water, and left them in a corner of the laundry room (a cool, well-lit room without direct sun). That evening, I did some online research to see if these branches had a chance of blooming and was so discouraged that I just let them sit in the bucket...for two weeks!

The water was starting to get cloudy by the second weekend, so I knew I had a decision to make. The buds weren't shriveled, so I cut each stem (under water) to the length I wanted and immediately put them in a large glass jar with about an inch of water in the bottom. I brought the level of water up to a quart and added lemon juice, bleach and sugar (see recipe below) as a floral preservative. I swizzled it around and set the whole "arrangement" on the counter, not far from where they were before.

I continued on with life until I returned home one evening later that week to find my laundry room in bloom! It took 23 days from cut to bloom. It's been another 5 days and if possible, there are even more blooms and the water is still clear.

Here's what I should have done according to my research.

  • Waited for outside temps to warm up to at least 35 degrees F for about 3 days in a row.
  • Mixed up the preservative water separately, letting the water sit first to allow any chlorine to evaporate. (Commercial flower preservative works as well.)
  • Immediately put the cuttings in a bucket of warm water (not giving them a chance to dry out on the lane).
  • Cut the stems to length (under water & at a steep angle) ASAP.
  • Cut vertical slits in the bottom of each stem (or smashed them with a hammer) - to enhance water uptake.
  • Removed the buds that would be under water with a thumbnail. (I got this right!)
  • Quickly put each stem in the jar with the preservative water.

Why did I have success? First of all, forsythia is very forgiving. Perhaps the cold temps worked in my favor? Too cold to dry out in the time between when I cut them & placed them in water. Why didn't the stems rot without the preservative during the 2 weeks they were in a bucket of water? It was relatively cool, around 60 degrees. There was no direct sunlight. My water (which comes from a spring) is zapped by UV light destroying any bacteria. I did cut the stems properly, as I knew to cut at an angle to allow the most surface area to take up water. I took 'soft' cuttings rather than more woody ones (think apple trees). Plus, I may just have been lucky. I'm not saying not to follow the rules, but if you can't do them all perfectly, just do your best and see what happens. You may have to wait a bit longer for flowers or change the water more often, but hopefully you'll be well rewarded. I've just inspected the apple and magnolia trees in my yard and need to wait for their buds to swell a bit more, but will be trying them next. Meanwhile, I've cut more forsythia and am hoping they'll bloom sooner if I follow my advice.

A couple more tips:

  • Select stems that shoot straight up to the sky rather than ones with side shoots. These are more green to red than the woodier branches. (Don't worry that the buds at the bottom are small, you'll cut that off unless you're creating a floor-to-ceiling arrangement.)
  • Remember that what you prune off isn't going to grow back in that spot. Not a problem with a large forsythia, but if you're pruning a young crab apple, start by just pruning out the branches you want to remove, then take your cuttings from what's on the ground.
  • Try forcing blooms on any spring-flowering tree or shrub. Lilacs, citrus, plums, peaches, almonds...the list goes on. It's a good way to thin things out at a time when there's not a lot else you can do outside if you live in a cooler climate.
  • Take more cuttings than you'll think you need. Sometimes "more" is better.

Recipe for preservative water: (this works for cut flowers, too)

1 quart lukewarm tap water - let it stand for a few hours if it's chlorinated
1 teaspoon sugar
2 teaspoons lemon or lime juice
1 teaspoon household bleach

Starting forsythias from cuttings:

If you're wondering if you can start a forsythia bush by sticking a cutting in the ground, the short answer is "yes". The longer answer is that you need to wait until the ground thaws enough that you can get the cutting in the soil. (Remember the air temperature warms faster than the soil in the spring, so be patient.) If you wait until the branches leaf out, there's less chance of success. Select young stems rather than old woody ones. Remove the buds that will be in the ground w/ your thumb before "planting". You can cut one long branch & make smaller cuttings by cutting it into pieces. Be sure to stick them in the ground right side up by comparing the direction of the buds on your cutting to the buds still on the parent plant. How long should each cutting be? You'll need a few buds below ground & several above. I'd not make it so long that it falls over, but long enough that you won't step on it or mow over it either. It's your choice. Finally, don't use the same cuttings you forced into bloom in the house. Get new ones in the spring while it's still cool outside, but after the frost has left the ground.

Linda Grotzinger


Sunday, February 20, 2011

Intro...

As Technical Manager for Hot Pepper Wax, I plan to use this space to share garden-related thoughts & experiences generated by conversations with our customers & fellow gardeners. I currently live on a farm in western Pennsylvania that I share with 3 cats, 2 border collies and 5 llamas, so while you may be envisioning a garden disked up each spring with the old Ford tractor, it may surprise you to know that I grow all my fresh veggies & herbs in a space no larger than the average suburban garden.

After living & gardening in 6 states over the past 25 years, I feel somewhat like a tomato transplant as I've had to adapt to each new location. My first gardening experience was in California, helping my parents weed the shrub beds, apply fertilizer, and water the dry spots in the lawn with a hand-held fan spray nozzle. Later, as a student of horticulture at Colorado State, I learned the science behind these practices and embraced the newest technology. Then, as a nursery & landscape manager in several Rocky Mountain states, I learned the value of water, and developed a life-long interest in native plants and regional landscapes. A move to Phoenix required yet another adjustment to climate, soils & plant species. There I relied on water-efficient plants for seasonal color and food for local wildlife while I adapted to a Southern growing season.
When I settled on the farm in PA, I adapted again. I opened my first bag of lime. I found there was no need for a pick axe to plant a tree. I enjoyed the benefits of a real beehive. I appreciated the free earthworms. And, just as I was getting used to nature's own "irrigation", I became acquainted with insects & diseases I'd only seen in textbooks.

With basic horticulture science as my foundation, each year's unexpected events keep me engaged in gardening. This year, I'm planning to "landscape" around the house with my own "field trial" of sunflowers in beds. These beds will eventually become home to adapted shrubs and perennials once I've done my research and created a design that pleases me.

As for this blog, I've had requests for getting started with asparagus, for guidance on selecting healthy plants, and for my opinion of those upside-down tomatoes. If you have an idea or two, send me an email at lindag@hotpepperwax.com and check back to see if they appear here in the future.

Meanwhile, it's time to take the camera into my garden on those sunny, snowy days and enjoy my winter garden while it prepares for spring.
Monarda in January